

Maintenance and inspection
HOME> Support Services> ATOM 2 Series> Getting Started> Maintenance and Inspection
Oil Maintenance
Before using it for the first time, it is recommended to add the lubricant included in the kit to the "ball joint" and "carbon fiber rod magnet". After oiling, it can reduce the friction between the parts and make the machine move more smoothly. To
After the machine has been used for a period of time, in addition to oiling the "ball joints" and "carbon fiber rod magnets", you can also add lubricant on the upper and lower sides of the "slider". This step is very important. It is recommended to check the lubricating oil every month. Regular maintenance of your Atom will make it more durable!
1. Put a little lubricating oil on both ends of the pole magnet to make it move more smoothly.
2. Put a little lubricating oil on the sliding table on the slide rail, and slide it up and down slowly so that the lubricating oil covers the entire slide rail. To
After adding lubricating oil, the friction between objects will be greatly reduced, which can increase the smoothness of operation. Choosing appropriate lubricating oil can make the Atom 3D printer have better printing quality and ensure the service life of the main parts. It is recommended to check the printer every week and carry out routine oiling and maintenance to ensure The printer is in its best condition.
note!
If a belt is tied between the sliding table and the motor, and the motor is connected to the circuit board, remember to unlock the motor (Disable Steppers) on the LCD panel first. It must be very slow when sliding. If you slide quickly Sliding table may cause the chip on the circuit board to burn off, causing permanent damage!
Selection of lubricating oil
1. It is recommended to use non-corrosive lithium-based lubricants on Atom, such as molybdenum disulfide lithium-based lubricants. If you use sewing oil, the ingredients in the sewing oil will corrode ABS plastic and rubber. It can be applied to general metal parts, but different rubber and plastic products have their own suitable lubricants. Please choose carefully and pay attention. Is the sewing machine oil volatilized or dried?
2. It is not recommended to use WD40. WD40 is mainly used for derusting and degreasing. It is not the most suitable lubricant for Atom. It will remove the original oil film and damage the plastic. It is not suitable for lubrication purposes. Take bearings as an example, because WD40 has good permeability and will dissolve and wash out the high coefficient lubricating oil originally used in the oil seal of the slide rail and the bearing, which will reduce its life.
Roll storage method
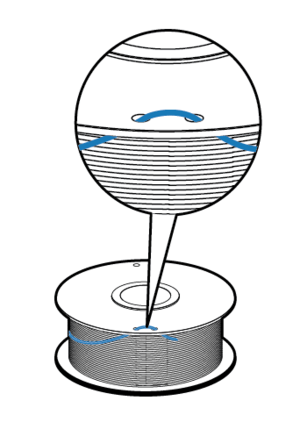
When you want to store the thread material roll, be sure to tighten the thread and insert the end into the hole on the package to avoid loosening the thread and cause entanglement and knotting, and then put it in a plastic bag, fresh-keeping box, or put it in a moisture-proof box . To
It is recommended that the unsealed rolls be used up as soon as possible. If it breaks with a light hand, it means that the wire has been damp. To
If the wire is damp, it is easy to cause the following problems during the printing process: printing material is broken, the nozzle is blocked, the printing model will have air bubbles....
Overall Institutional Inspection
Remind you, please refer to the manual provided with the machine for institutional inspection.
The user of the whole machine is not allowed to disassemble or install the hardware without the permission of the original factory personnel, so as not to affect your warranty rights.
● Check one
The aluminum extrusion and the triangular connection are closely matched to ensure that there are no gaps or height differences between the structures.
● Check two
1. The slide table and slide rail of X, Y, Z axis should be locked, and the belt should not be too loose or too tight.
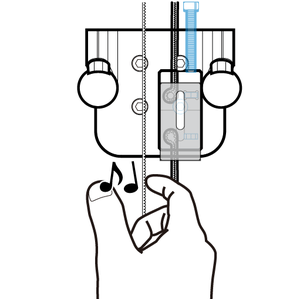
2. You can download the tuner app with your mobile phone to confirm. Please don't measure when it is turned on, so as to minimize the surrounding noise. Gently dial the opposite side of the belt adjuster by hand. The frequency can be between 45 and 55 Hz, but the three-axis belt needs to be at the same frequency.
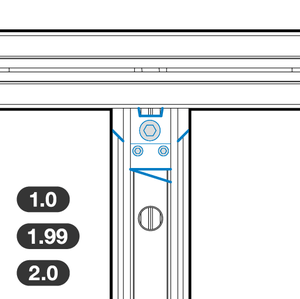
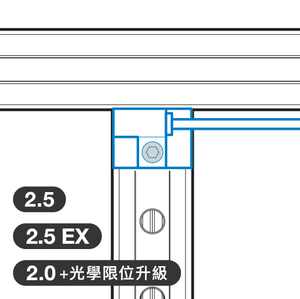
● Check three
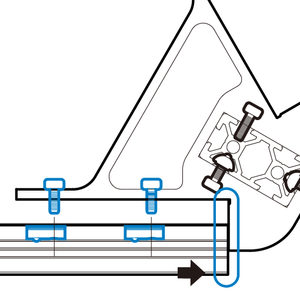
The limit switches (optical and mechanical) and slide rails of X, Y, and Z axes must be pushed to the end and must be locked. Refer to the two pictures below.
● Check four
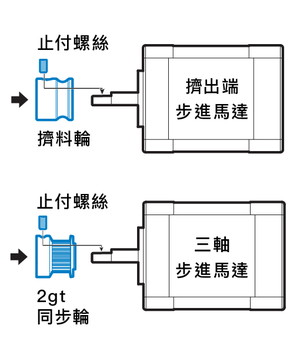
Check whether the stop screws on the squeezing wheel and the synchronization wheel are indeed locked on the half-moon plane of the motor shaft.
After confirming that it is locked, execute Auto Home, and the motor will be locked after power-on. Gently pull the belt of the three shafts up and down to observe whether the synchronization wheel rotates. If it does, it means that the synchronization wheel is not locked. Please tighten the stop screw and try again. To
● Check five
Do not use cable ties or tape to fix the hub, otherwise it will affect the movement of the mobile platform and cause the automatic calibration to be inaccurate.

Mobile platform check
Note! Do not touch the heated nozzle without any protective measures!
There are two versions of the mobile platform nozzle module below. Please check the steps according to your nozzle style.
※Remind you that the user of the whole machine is not allowed to disassemble or assemble the hardware without the permission of the original factory personnel, so as not to affect your warranty rights.
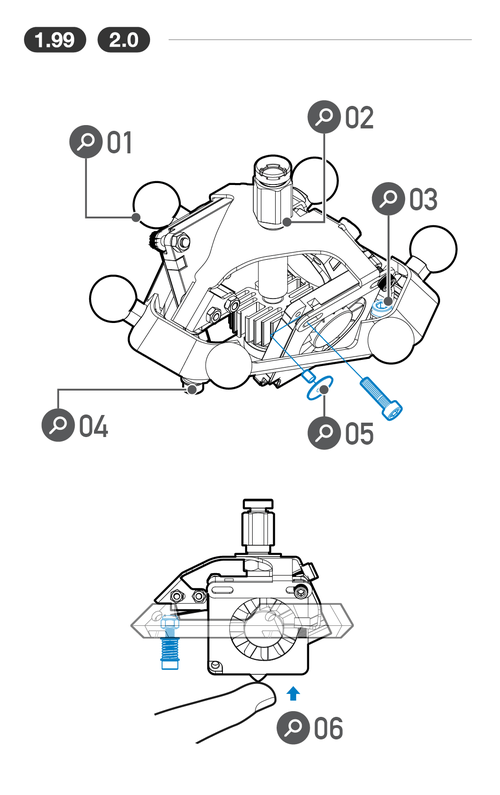
Atom 1.99 and 2.0
Check the content below, you can compare the numbers on the left.
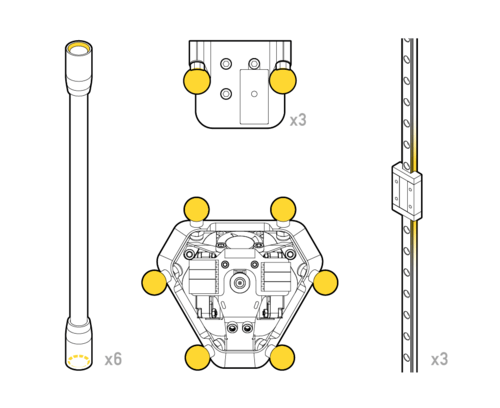
01 Each ball head must be locked to a flat surface, and the thread must not be exposed or loosened.
02 The quick connector needs to be firmly locked on the upper cover of the mobile platform.
03 The upper cover of the mobile platform must be locked flat and tightly.
04 The gasket must be installed correctly to prevent interference and auto-correction.
05 Confirm that the side blowing fan and the upper cover of the mobile platform are properly installed. Please be careful not to shake or get stuck on the mobile platform.
06 Please make sure that the nozzle is at room temperature, hold the base of the mobile platform with your thumb, and tap the nozzle from the bottom up with your index finger to make a smooth click.
If you are unsure of the nozzle screw adjustment method, please go to "Step D. Distance between limit switch and screw" in the pre-preparation for automatic calibration.
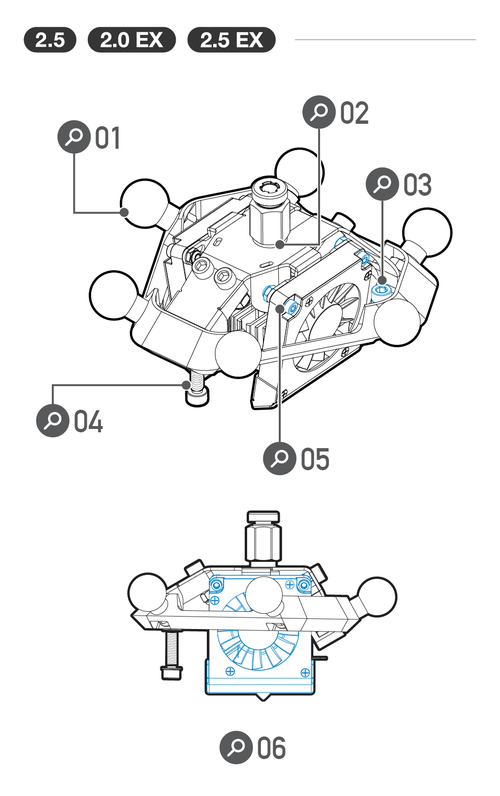
Atom 2.5 series
01 Each ball head must be locked to a flat surface, and the thread must not be exposed.
02 Confirm that the nozzle quick connector or nozzle deflector is firmly locked on the upper cover of the mobile platform.
03 Make sure that the upper cover of the mobile platform is properly locked and locked on the mobile platform.
04 Confirm whether the gasket is installed correctly to prevent interference correction.
05 Confirm that the side blower fan and the upper cover are properly installed.
06 The thumb is holding the base of the mobile platform, and the forefinger taps the nozzle from bottom to top to move smoothly, which means that no parts interfere with the mobile platform.
Step D. The distance between the limit switch and the screw: Use this article to understand the correct installation position and principle of the screw.
Line inspection
● Check 1
Please check that each wire above the nozzle is correctly connected.
If it cannot be heated after turning on, the ceramic heating plate (blue line of the nozzle);
If the temperature cannot be sensed, please check the thermistor (yellow line of the print head) first.
Please see the inspection method here.
● Check 2
If the wires at the feed end are all connected, please check whether the screws on the control board only bite into the wire skin, but not the metal parts of the wires. Please note: the red and black wires of the side blower fan are most often connected poorly. .
Can't solve the problem?