

Get Start
HOME> Support Services> ATOM 2 Series> Getting Started> Teaching for the first time
How to get started?
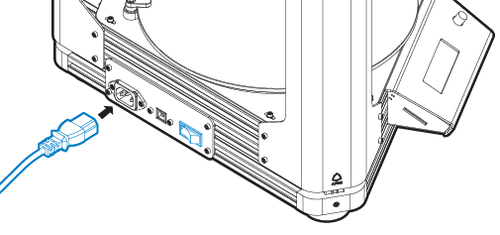
1. Connect the assembled machine and turn on the power.
2. Bed Leveling
Before using it for the first time, or when you carry or disassemble the nozzle or glass, you need to do automatic calibration. You don't need to do automatic calibration every time you turn on the machine (please click here to watch the automatic calibration teaching). To
3. Apply lipstick glue or turn on the hot bed (if any)

In order to make the printed matter adhere to the glass platform, you can apply lipstick glue or turn on the hot bed.
If you use lipstick glue, apply evenly on the area that needs to be printed as shown in the picture on the left. If you can’t stick to the glass platform in winter or warping, you can use both hot bed and lipstick glue to increase adhesion. After printing, the glass can be wiped clean with alcohol to avoid stains, oil stains or fingerprints causing inability to adhere.
In addition to the above methods, 3M blue masking tape can also be used to affix it flat on the platform, but the automatically corrected Z-offset value needs to add the thickness of the tape. To
4. Print the official test file 300mm Height
1. Feeding Teaching
2. Click here to download the official test file (.gcode file)
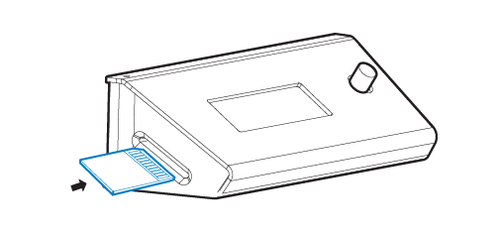
3. Save 300mm Height to SD card
4. Insert the SD card into the SD card slot of the LCD
5. Rotate the LCD knob to select Print from SD
6. Select 300height.gcode
Start printing
1. Feeding teaching.
2. Download or export the STL file first.
Please use 3D drawing software to export the STL file, or download the file from the 3D model sharing website.
3. The STL is loaded into the slicing software that has been set successfully.
Regarding the installation of the slice software and loading of configuration files, please click here to enter and watch.
4. Use slice software to generate gcode file and save it in SD card.
Regarding the basic teaching of operating the slicing software, please click here to enter and watch.
5. Place the SD card in the SD card slot beside the Atom LCD screen.
6. Select "Print form SD" via the knob on the LCD screen of Atom.
7. Select the Gcode file you just cut. Click the knob to start printing.

Can't solve the problem?